Showing posts with label Howto. Show all posts

Thursday, 30 July 2015

Install Windows 10 On Mac Using Boot Camp, Here’s How [Tutorial]

The following step by step tutorial will help you install Windows 10 on Mac using Boot Camp Assistant software by Apple.
Before you begin, make a full backup of your Mac using Time Machine that you can restore to in case anything goes wrong.
All set? Lets begin!
Windows 10 on Mac main
Requirements:
  • Up to date version of OS X running on a Mac with at least 2GB RAM.
  • A minimum of 30GB of free hard drive space on Mac.
  • Genuine Windows 10 product key.
  • A minimum of 16GB USB flash drive to install Windows 10 with all the required Boot Camp drivers.
  • Windows 10 ISO file. Get it from here: Download Windows 10 Pro ISO File Without Product Key From Microsoft.
How to install Windows 10 on Mac:
Step 1: Launch Boot Camp Assistant. Do a Spotlight Search for it.
Step 2: Check both options under this ‘Select Tasks’ window as shown in the screenshot below.
Screen Shot 2015-07-30 at 9.15.59 AM
Step 3: Insert your USB flash drive and select your Windows 10 .iso file, as shown again in the screenshots.
Screen Shot 2015-07-30 at 9.18.12 AM
Screen Shot 2015-07-30 at 9.17.49 AM
Step 4: Click Continue, you will get a warning saying your flash drive will be formatted. Click on Continue again.
Screen Shot 2015-07-30 at 9.18.03 AM
Step 5: Now sit back and wait for Boot Camp Assistant to copy all the required Windows files and Boot Camp drivers to your USB drive. This could take a while depending on the speed of your Internet connection and your computer.
Screen Shot 2015-07-30 at 9.19.11 AM
Screen Shot 2015-07-30 at 9.47.27 AM
Step 6: Once the USB drive is ready, it will ask you to create a Windows partition. Select at least 30GB for Windows 10 and then click on Install button.
Screen Shot 2015-07-30 at 10.00.45 AM
Step 7: Boot Camp will now create the required partition and then it will reboot your Mac.
Step 8. On restart, you will be booted into Windows Setup screen.
Win10setup
Step 9: From here, enter your product key when asked, select your Boot Camp created partition when prompted on where to install Windows. Basically just follow the on-screen prompts to start Windows installation process.
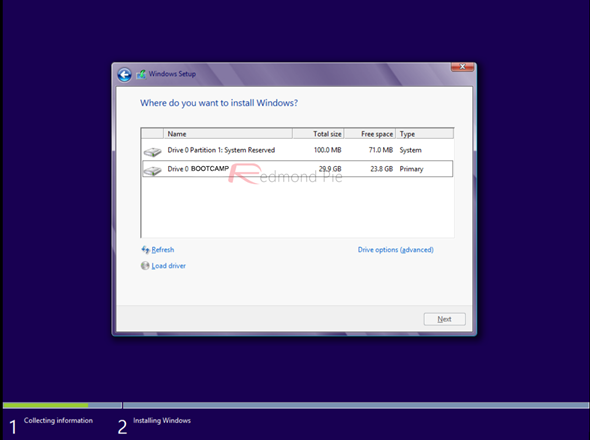
Photo-06-04-2013-8-20-48-PM.png
Step 10: Once Windows is installed, your Mac will automatically reboot right into Windows 10.
Step 11: Once you have set up your login account stuff and are in desktop, you will need to install Boot Camp drivers for your Mac. These are the same drivers which were copied by Boot Camp Assistant software to your USB in Step 5 above. Simply navigate to contents of USB flash drive from File Explorer and run setup.exe to install the required drivers for your Mac.
Step: 12: After the drivers are installed and your computer is rebooted, you should now have fully functional Windows 10 running on your Mac.
win10desktop
Dual-boot Windows 10 with OS X:
Now to dual-boot between the two operating systems, that is Windows 10 and OS X Yosemite, during Mac’s startup boot chime, press and hold option/alt key until you are presented with a menu to choose between Windows and Mac partitions, select your desired OS to boot into it.


Wednesday, 29 July 2015

Download Windows 10 Pro ISO File Without Product Key From Microsoft

Microsoft Windows 10 is finally here, and according to Microsoft Chief Executive Officer Satya Nadella, it marks a “new era” for personal computing. It remains to be seen as to whether consumers and businesses around the world will agree with Nadella’s assessment of the operating system, but it’s safe to say that this is Microsoft’s most ambitious and potentially impressive launch till date.
We understand that the majority of users would have downloaded Windows 10 directly through ‘Windows Update’ as part of the free-of-charge upgrade process, but for those in need of an official Windows 10 ISO file, rest assured that Microsoft hasn’t forgotten about you.
Windows 10 ISO main
Microsoft has clearly attempted to make sure that all bases are covered for this release of Windows. Although the company started initiating pre-downloads of the operating system to registered PCs approximately 24-hours before the official launch, it does appear to recognize that some consumers would require an official ISO image of the Windows 10 platform whenever the need to manually install or reinstall the OS on a formatted machine arises. The ISO image will of course allow for the creation of a bootable USB flash drive or DVD, to serve as an installation source.
Best of all, you don’t need any product key to download the ISO media file from Microsoft. Just about anyone can download it as long as they have an Internet connection. Though it is important to note that genuine Windows product key will be required during clean installation process.
As part of the ISO offering, Microsoft has created a relatively small check list of what’s actually required before beginning the download:
  • An active and reliable Internet connection.
  • Enough storage space available on the computer being used to download the ISO.
  • A blank USB storage device or DVD with at least 4GB of space for the creation of media. There’ll also be the requirement for a DVD burner if that’s your chosen medium.
  • Make sure your PC meets all other Windows 10 requirements, you can check those here: How To Prepare Your PC For Windows 10 The Right Way [Guide].
  • As mentioned above, if you are doing a clean install, a genuine Windows product key will be required during installation process.
If all of those criteria are met then Microsoft has put up an official Windows 10 Disc Image (ISO) download page here.
Select your desired edition:
Screen Shot 2015-07-29 at 8.20.42 PM
Select the language:
Screen Shot 2015-07-29 at 8.21.04 PM
And you’re good to go!
Screen Shot 2015-07-29 at 8.21.20 PM
It really couldn’t get any simpler, and it’s great to see that Microsoft has attempted to cover all avenues with this Windows 10 release.
IMG_2796
You may also like to check out:


How To Download And Install Windows 10 Free Upgrade [Tutorial]

Windows 10 is now live, if you are eligible for a free upgrade, you will get a notification for the download soon.
The following tutorial helps you download and install the free Windows 10 upgrade on your PC.
Windows 10 final install guide main
Before you begin, make sure:
Step 1: Run Windows Update and see if your free reserved copy of Windows 10 is ready for install. It is important to note here that Microsoft is doing a phase rollout which means not everyone will get the update on day 1.
Windows 10 force download
If your Windows Update is showing you ‘We’ll let you know when the upgrade is ready to be installed on this PC.’ message, fret not, you can force it to download the update right now without any waiting time. Follow the instructions here on how to do that: Force Download Windows 10 Free Upgrade Right Now, Here’s How [Tutorial].
Windows 10 force download 3
Step 2: When Windows Update is finished downloading Windows 10 update, you will get the following prompts.
Either click on Restart now on Windows Update screen.
Windows 10 force download 9
or Start the upgrade now on this screen.
Windows 10 force download 12
Step 3: Your PC will now reboot, after which Windows 10 installation will automatically begin.
The installation is divided into three phases: Copying files, Installing features and drivers, Configuring settings.
IMG_2794
You don’t need to do anything. Just wait patiently for it to do its thing. During the installation process, your computer may restart a couple of times. The duration of this process can take anywhere from 10 to 15 minutes, depending on the size of your data and speed of your computer.
Step 4: Once the installation is complete, you will boot into this screen.
IMG_2795
Step 5: Now simply follow the on-screen instructions to get to the login screen.
IMG_2796
That’s it! You’re done! Happy Windows 10 day!


Tuesday, 28 July 2015

Here's how to safely clean your Android device

Water and cleaning solutions don't mix too well with electronic circuitry, however, so it can be difficult to know how to keep your handset looking its best without ruining it. We've gathered together some tips on device maintenance to help you clean your phone or tablet safely.

1. Cleaning the screen

The screen is the part of your device where you're likely to notice dirt and smears the most, so it's important you know how to clean it effectively. Your first port of call should be a microfiber cloth, which you can run across the display — in fact if you're lucky your phone might have come with one.
androidpit microfiber cloth
Microfiber cloths can be used on the screen. / © Flickr
Ordinary water is more effective than you might think, but use it sparingly and distill it first to remove any lurking chemicals (avoid using any type of chemicals on your screen, as they will interfere with the coating). Wipe the display in steady, straight lines using the cloth and possibly a little water.
Scotch tape is one way people have tried to get the grime and prints off their smartphone display, though we've found the aforementioned microfiber cloth to be a more effective method. Stock up on plenty of the cloths and change them regular to keep getting an effective clean.
androidpit samsung phone screen
The screen is the most important part of your phone. / © Samsung
You can try the cloth with or without a small amount of water to dampen it but if you do opt for the later then turn the device off first. The trick is to take your time and to work in small sections. When you've finished, use a dry part of the cloth to remove any lingering water on the screen.

2. Cleaning the body

For the rest of your device, a cotton tip dipped in a watered down alcoholic solution works a treat provided you keep the moisture to a minimum. The end of a paperclip or a toothpick can be used to clear out cruft from speaker holes, although this is admittedly a rather time-consuming process.
androidpit cotton swabs
Use cotton swabs for the casing. / © Wikimedia Commons
You can use a dry cotton swab or a can of compressed air to remove dust and other dry bits of dirt that have become attached to your phone. Avoid using standard household cleaners and disinfectants in your work, as they'll stain or otherwise damage your precious Android device.
A 50-50 mixture of water and white vinegar can work as well as rubbing alcohol if you want to give the casing of your phone a thorough clean. If you're dealing with a metal backing or trim then sticking to ordinary water may prove a better option (check with the manufacturer if you're not sure).
androidpit samsung back case
Different methods require different techniques. / © Samsung
The best method for cleaning the phone case depends on the materials used: Obviously you can be relatively aggressive with a plastic back, especially if you have a waterproof phone. Leather backs (like those on the new LG G4) are going to need a dedicated leather cleaner for best results.

3. Maintenance tips

Besides the actual process of cleaning, there are some day-to-day maintenance tips to bear in mind if you want to keep your smartphone or tablet running healthily. It's a lot like making sure your car is regularly maintained and serviced to keep it in a roadworthy condition.
androidpit samsung charging
Keep your phone at the right temperature, especially while charging. / © Samsung
Temperature is a big one: Take note of the minimum and maximum temperatures listed in your phone's documentation and make sure it's not left anywhere where these could be exceeded (like on a cold window ledge or inside a hot car). You could risk permanent damage to the handset.
Cases and screen protectors are obvious ways of keeping your smartphone from coming to any harm but make sure you check ratings and reviews carefully and double-check on compatibility before you make a purchase. When charging, it's a good idea to take your phone out of its case to prevent temperatures from rising too high.
androidpit galaxy s6 cover up cases 2
If you have any common sense you'll take particular care when holding your phone above a large drop or a body of water, and you should also avoid handling it when you've been using your hands for preparing food, digging in the garden or doing anything else that could get dirt or germs on it.
Microfiber cloth and cotton swab pictures courtesy of Wikimedia Commons and Flickr.


Monday, 27 July 2015

Find WiFi Network Password On Windows Or Mac OS X, Here’s How

We all connect to so many different WiFi networks that it’s easy to get them mixed up. You no doubt have at least one WiFi network at home, then there’s the one at work, and probably one or two at your favorite coffee places, plus any others we missed for the list. WiFi is the lifeblood of computing, and we often take it for granted.
If you’re anything like us, you connect to so many different networks that it’s easy to forget which password belongs to which, and that problem is only amplified if you use more than one machine, or have perhaps a tablet and smartphone to connect as well. All these connections mean it’s surprisingly easy to forget the password to your networks, and while that might not be a problem the majority of the time, if you want to connect a new device then you’re going to need that password. Thankfully, if you’ve got a machine handy that’s already connected, finding the password out is as easy as entering one command.
WiFi
Depending on whether you’re using a Mac or a Windows PC, you’ll need to enter one of two commands. Here’s what you’ll need to do.
Mac OS X:
  1. Open a new Terminal window via either the Applications folder or Spotlight Search.
  2. Copy and paste this command, replacing the ‘SSID’ text with the name of your network: security find-generic-password -ga SSID | grep password
  3. You may be prompted to enter an administrator account’s username and password, but after that you’ll be shown the password for whichever WiFi network you’re using.
Windows:
  1. Run Command Prompt.
  2. Copy and paste this command, replacing the ‘SSID’ text with the name of your network: netsh wlan show profile name=SSID key=clear
  3. You’ll now be shown your WiFi network’s password.
It’s worth noting that you’ll need to enter you network’s name exactly as it is presented – it’s case sensitive – else you’re not going to get very far. Make sure any zeroes aren’t the letter Os as well because that’s a very easy mistake to make!
Wifi.jpg
And that’s how you find the password of the WiFi network you’re currently logged into.


5 superpowers you didn't know your Android phone had


You're probably aware of most of these uses — checking social media, sending emails, even making phone calls and texts — but you might not have discovered all of the ways you can use your Android smartphone. Here are five superpowers your phone has that you can take advantage of.

Document scanner

In the early days of digitizing documents and photographs, you had to invest in a large flatbed scanner to turn the physical into the digital. Nowadays you can use your smartphone camera as a makeshift scanner, and although the quality isn't quite as good the process is a lot more convenient.
androidpit camscanner ii
If you want to use your phone in this way there are a number of options — you can of course just snap a document and save it as an image, for example. Google Drive can convert scans into PDF files and read the text within them, as can the excellent CamScanner. Evernote is another app with this function.

Wi-Fi hotspot

Tethering is a feature that most of you will be aware of but not everyone knows you can turn your smartphone into a Wi-Fi hotspot, and it's easier than ever to do on Android Lollipop. The process turns your phone's cell connection into a Wi-Fi network that other devices can log into.
androidpit wi fi hotspot
So how do you do it? On Lollipop head to Settings then choose More and select Tethering & portable hotspot. You can set the network name and the password required to access it, but make sure you keep an eye on your phone's data usage — otherwise you might be met with a steep bill.

Compass and barometer

Do you know about all of the different sensors packed inside your phone? Not only does your mobile know which way is up and down, it also knows which way is north, and you can download an app such as Smart Compass or AndroiTS Compass Free to use your phone to navigate your way around.
androidpit compass
Many phones have a barometer in them too, so you can turn your mobile into a portable weather station and get your own forecast for the exact spot you're standing in. Apps such as Barometer Altimeter DashClock and Barometer Monitor can help you see which way the weather's turning.

Barcode reader

Back to the camera on your smartphone: You can turn it into a useable barcode scanner with ease and an app such as the aptly named Barcode Scanner. The app works with QR codes as well as barcodes and there are plenty of third-party apps on the Google Play Store that do the same job.
androidpit barcode scanner
Why would you want to scan a barcode? It largely depends on the app you're using but shopping is the main reason: If you see something in a store you can check up on the online price, for example, or you can use your smartphone to quickly order something you're about to run out of.

Fitness tracker

Many of the same sensors and bits of circuitry you can find inside a smart wristband can also be found on your phone, which means you can track your walking, running and other activities without having to fork out for an extra fitness tracker and wear it around your wrist or clipped to your clothes.
androidpit google fit ii
Google Fit in action. / © Google
Google Fit is the obvious place to start but many of the well-known fitness tracking apps can work with phones as well as wearables. If you need extra data then that's possible too — apps like Runtastic Heart Rate Monitor and Instant Heart Rate can measure heart rate through your phone's camera.


Sunday, 26 July 2015

10 best Android features you can’t live without

samsung galaxy s6 release date
Wireless charging: great, and becoming more useful by the day / © Samsung

1. OK Google

Remember back in the day when we used to operate our phones with our fingers? Crazy times. These days, of course, it’s all about voice control and the always-attentive Google Now. A single “OK Google” is the first step of a journey of discovery, or at least of setting a reminder to get some milk on the way home.

2. Google Now

Apple’s still trying to copy this one: Google Now, and the incoming Google Now on Tap that will make the feature work inside apps in Android M, is a marvel. There’s a price to pay for its usefulness, and that price is giving Google access to your email, your calendar, your private thoughts and your darkest desires, but that’s a small price to pay for a system that makes the information you appear when you need it, even when you didn’t know that you needed it. It’s mobile magic!
androidpit google now card teaser
3. User accounts
We don’t use this much on our phone, although it’s nice to have the option, but if like us your tablet isn’t your tablet but everybody in the building’s tablet then having multiple user accounts is a feature you genuinely couldn’t manage without. It’s also handy to have a guest mode for when people are over: it means they can get online and check stuff without seeing your private emails or secret plans for world domination. And of course it’s good for keeping kids from messing with your stuff.

4. Active/Ambient Display

It’s not available on every device - you officially need a device with an OLED screen, although third party apps can add similar features to other devices - but on the devices that have it it’s a really great thing to have. Like many good things it’s both simple and useful: when a new notification arrives, the screen briefly displays it so you can either do something about it or ignore it without having to reach for and wake your phone. It also wakes the screen when you pick the device up, saving you a swipe.
AndroidPIT Nexus 5 Ambient Display notification
5. Quick Settings
Android’s Quick Settings panel appears in many guises, often with redesigns courtesy of phone firms, but no matter what it looks like it’s an incredibly useful thing to have. Quick Settings doesn’t just provide you with instant access to the most commonly used features and settings on your phone; it also notifies you if there are problems with any of them. Apple liked Quick Settings a lot, but it definitely didn’t copy it: while Android’s Quick Settings slide from the top, Apple’s equivalent slides from the bottom. See that? That’s innovation.

6. Priority Mode

If like us you carry your device with you at all times, being able to set different priority levels for different things is a really useful feature: it means you can ensure you don’t get bothered with personal stuff when you’re at work, or that you won’t be bothered with work stuff when you’re trying to have a nap. This is another thing Apple has copied, but Android’s version is more nuanced: we particularly like the ability to set downtime, a period during which interruptions are blocked and after which the interruptions are automatically switched back on. That’s really handy.
androidpit nexus 6 notifications
7. Pin App
The ability to pin an app - to make it full screen and keep it there until you enter a passcode - isn’t just for keeping kids in games; it’s also useful when you show somebody a funny text and they immediately start trying to look at your other messages or your photo album.

8. Wireless Charging

Not all Android phones belong to the wireless charging club, but the ones that do are that little bit less demanding than ones that don’t - and with wireless charging mats starting to appear in everything from coffee shops to IKEA furniture, they should become that little bit more useful when we’re out and about too.
AndroidPIT LG G4 low battery hero 3
9. Fast Charging
If your device supports it (and the manufacturer includes a fast charger in the box - not every one does), fast charging is awesome: it amps up the power to start off with and get as much juice into the battery as quickly as possible, and once it’s done that it calms down a bit to finish topping up the charge. What that means in practice is that you can go from no-battery to woah-battery very quickly, which is a real boon for anybody who really hammers the battery on their phone and needs to charge it during the day.

10. Choice

Not strictly a feature, no, but it’s one of the reasons so many people like Android: unlike certain other platforms, there’s a massive choice of handsets to choose from at all kinds of prices - and even the really cheap ones are really good.
Do you have a favorite Android feature we’ve missed? Let us know below!


How To Prepare Your PC For Windows 10 The Right Way

After what seems like forever, Windows 10 is almost upon us. Microsoft has been working on the replacement for Windows 8/8.1 for a good while now, and if you can overlook the omission of Windows 9 from Microsoft’s release schedule, Windows 10 is shaping up to be well worth installing. Going live on July 29th, the Windows 10 update is one that many should be readying themselves for, especially considering that the upgrade won’t cost most people a penny.
If you’re just starting to get all of your ducks in a row for Windows 10, then here’s a handy rundown of what you need to make sure everything is in order before hitting that Install button. Better safe than sorry!
Windows-10-prepare main
Check System Requirements:
There’s nothing worse then psyching yourself up for a big Windows upgrade only to find out that your old PC just doesn’t cut the mustard anymore. Luckily, the list of things needed in order to get Windows 10 installed is a short one, with just 1GB of RAM needed for the 32-bit version and 2GB required for the 64-bit flavor. Around 20GB of free space should see you through just fine, and a screen resolution of no lower than 800×600 is needed in order for Windows 10 to be installed. Apart from that, you should be good to go no matter what you’re using.
  • RAM: 1GB for 32-bit / 2GB for 64-bit
  • Storage: 16GB for 32-bit / 20GB for 64-bit
  • CPU: 1GHz or faster
  • Graphics: DirectX 9 capable video card
Backup:
Make sure you backup your data to either a cloud based service like Microsoft own OneDrive or locally using any external hard drive you may have.
Free up Space:
With around 16GB required for the 32-bit version of Windows 10 and 20GB for the 64-bit, you may need to start deleting unused files and removing applications that you don’t need anymore. Clearing caches and deleting temporary files using Disk Cleanup utility in Windows is usually good for taking some of your hard disk space back, but it’s applications that take the most space up here. Be ruthless – you’ll thank us for the relatively clean slate later.
Update everything:
It never hurts to make sure that you’re all updated to the latest version of whichever version of Windows you use before trying to make the jump to Windows 10. It really shouldn’t matter, but strange things happen when installing a new OS, especially one that is so new out of the gate. Make sure all of your drivers and security patches from Windows Update are up to date as well, whilst you’re at it.
Reserve your free Windows 10 copy now:
If you are running Windows 7 or Windows 8.1, you can reserve to get a free copy of Windows 10 as soon as Microsoft releases it officially next week. To reserve your copy of Windows 10, follow the instructions here:

Once all of those boxes are ticked, you should be all set for Windows 10 day. We’re quietly excited to see how the new version of Windows is received after lukewarm responses to Windows 8 and Windows 8.1, but we suspect that Windows 10 will right some of the wrongs of its predecessors.
Let’s hope so, at least.
Windows-10-1


These IFTTT recipes will improve your phone's battery life

androidpit ifttt channel

If you're new to the world of IFTTT (If This Then That), allow us to enlighten you. It's a free web platform that helps you connect all kinds of apps and services to suit your needs. It can do everything from text you weather alerts to repost your Instagram photos on Twitter, and it integrates tightly with the Android ecosystem as well.
The Android app itself is called IF and you can create 'recipes' (combinations of triggers and actions) from your mobile or via the IFTTT website. One of the channels added recently is the Android Battery Channel, which lets you take action based on your device's battery level. Here are some examples.

Creating recipes
As we've already mentioned, recipes can be built from the IFTTT web portal or through the Android app. You first need to choose a trigger (such as a low battery level) and then determine which action it will lead to (turning the Wi-Fi off, for example). If you play around with the channels, you'll see what IFTTT is capable of.

We won't explain how to create each of these recipes in detail but they're fairly straightforward — just work through the prompts as they come up on the IFTTT website or app (which you will need to install to monitor the current battery level of your Android device).
androidpit ifttt app

Turn off Bluetooth when the battery is low — IFTTT lets you build your own customized battery saver mode by turning off Bluetooth when your battery is running low. Without Bluetooth enabled, your phone or tablet uses up less power, so you can eke your battery life out a bit further.
Turn off Wi-Fi when the battery level is low — you can do the same trick with Wi-Fi, turning it off to conserve power when your battery dips below a certain point (IFTTT doesn't specify what this point is). This is obviously not one to apply if you rely on high-speed data transfer from your device at all times.
Mute the ringtone when the battery level is low — another way of conserving what battery life you have left is to mute your device's ringtone - playing those tunes uses up more energy than you might think. Again, the action happens automatically, so you might not even notice.
Send an alert when the battery level is low — perhaps you don't want IFTTT to do anything when the battery level is low, but you want to know about it so you can take action yourself. Choose Android Notifications as the action in your recipe and you can get an alert when there's a battery issue.
Keep track of charging times — IFTTT can trigger an action whenever you plug your device in to charge. You can use this option to add a line to a Google Drive spreadsheet or send yourself an email, and work out when your battery is dying (and then what you might be able to do about it).


Wednesday, 15 July 2015

How to recover deleted text messages on your Android phone

If you've deleted your SMS inbox you have to act quick, because the messages are only until the portion of memory on which they are saved is rewritten. The longer you wait, the higher the likelihood that deleted text messages, app updates or who-knows-what will be obliterated forever. Here's how to recover deleted text messages on Android.

Tools to recover deleted text messages
There are a couple of different PC and Mac-based tools to help you through this part of the process which we've detailed below.

The particular tool you choose will depend on your personal preference, but they basically do the same thing: scan your Android's memory, then identify and recover your ''deleted'' messages. They'll all walk you through the process, which is usually only four steps long: connect, scan, preview, recover. The process works for other data besides text messages as well. Some programs worth trying out include:
How to recover lost text messages on Android
Depending on which program you choose, the steps may be different, but the process is very similar (I'll use Wondershare for illustration purposes):

Download and install one of the programs above. Launch the program on your computer.
Enable USB Debugging on your Android phone. To do this, you need to have access to the Developer Options in your main Settings menu. If it's not there, just go to About Phone, scroll down to Build Number and tap it repeatedly until it tells you that you have developer access.
You'll now get access to Developer Options in the main Settings menu (just above About Phone). Go into Developer Options, scroll down to USB Debugging (or Android Debugging, depending on your ROM) and check the box.
androidpit debugging

androidpit wondershare 2
Follow the prompts in the recovery program to scan or analyze your Android's memory.
Once the process is complete you can browse and preview the deleted and undeleted data on your Android device. As long as the particular part of memory on which it was originally stored has not been saved over, you can still retrieve the data. This is why it's important to act quickly if you've lost data.
androidpit wondershare 3
Next, open the 'Messages' folder in the left-hand pane, select the messages you wish to recover, then click 'Recover' at the bottom right to put them back on your device or save them to your computer for safe keeping.
Wondershare2

How to never lose a text message again

Maybe you've learned your lesson, maybe you haven't. If you're not into paying for any of the programs above or simply don't like the free options, your best bet is to ensure you don't have to use them again. This means backing up your messages from now on. The good news is, it only takes five minutes.
I use a free app called SMS Backup & Restore. It's straightforward, looks nice and works perfectly: basically all you need for this type of operation. Check out the screenshots below for the walkthrough.
SMS Backup & RestoreInstall on Google Play
  • Once you've downloaded and installed SMS Backup & Restore, open the app then tap 'Backup'
  • Next, choose what exactly you want to create a backup of, then - crucially - tap 'Local Backup and Upload' if you want to send your backup to Google Drive, Dropbox or an email address. When you're ready, tap OK.
androidpit sms backup restore 2

androidpit sms backup restore 3
To restore your backed-up SMS messages, tap Restore on the app's home screen, then on the Restore Backup page you can just tap the backup name in the list to restore it if it's stored locally.
If your backup's stored in the cloud, tap the menu icon (three dots) at the top right, then 'Load from' and select whichever cloud service it's stored on.
androidpit sms backup restore 4
There are plenty of extra options in SMS Backup & Restore, such as scheduled backups and password protection. You can find these by tapping the menu icon at the top right of the app's home screen, then 'Preferences'.

androidpit sms backup restore 1
Have you ever lost your text messages by accident? Did you manage to recover them? How do you protect your text messages?