Showing posts with label Windows. Show all posts

Thursday, 30 July 2015

Install Windows 10 On Mac Using Boot Camp, Here’s How [Tutorial]

The following step by step tutorial will help you install Windows 10 on Mac using Boot Camp Assistant software by Apple.
Before you begin, make a full backup of your Mac using Time Machine that you can restore to in case anything goes wrong.
All set? Lets begin!
Windows 10 on Mac main
Requirements:
  • Up to date version of OS X running on a Mac with at least 2GB RAM.
  • A minimum of 30GB of free hard drive space on Mac.
  • Genuine Windows 10 product key.
  • A minimum of 16GB USB flash drive to install Windows 10 with all the required Boot Camp drivers.
  • Windows 10 ISO file. Get it from here: Download Windows 10 Pro ISO File Without Product Key From Microsoft.
How to install Windows 10 on Mac:
Step 1: Launch Boot Camp Assistant. Do a Spotlight Search for it.
Step 2: Check both options under this ‘Select Tasks’ window as shown in the screenshot below.
Screen Shot 2015-07-30 at 9.15.59 AM
Step 3: Insert your USB flash drive and select your Windows 10 .iso file, as shown again in the screenshots.
Screen Shot 2015-07-30 at 9.18.12 AM
Screen Shot 2015-07-30 at 9.17.49 AM
Step 4: Click Continue, you will get a warning saying your flash drive will be formatted. Click on Continue again.
Screen Shot 2015-07-30 at 9.18.03 AM
Step 5: Now sit back and wait for Boot Camp Assistant to copy all the required Windows files and Boot Camp drivers to your USB drive. This could take a while depending on the speed of your Internet connection and your computer.
Screen Shot 2015-07-30 at 9.19.11 AM
Screen Shot 2015-07-30 at 9.47.27 AM
Step 6: Once the USB drive is ready, it will ask you to create a Windows partition. Select at least 30GB for Windows 10 and then click on Install button.
Screen Shot 2015-07-30 at 10.00.45 AM
Step 7: Boot Camp will now create the required partition and then it will reboot your Mac.
Step 8. On restart, you will be booted into Windows Setup screen.
Win10setup
Step 9: From here, enter your product key when asked, select your Boot Camp created partition when prompted on where to install Windows. Basically just follow the on-screen prompts to start Windows installation process.
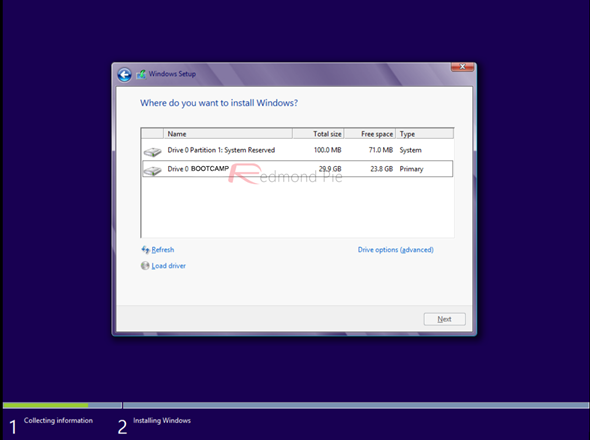
Photo-06-04-2013-8-20-48-PM.png
Step 10: Once Windows is installed, your Mac will automatically reboot right into Windows 10.
Step 11: Once you have set up your login account stuff and are in desktop, you will need to install Boot Camp drivers for your Mac. These are the same drivers which were copied by Boot Camp Assistant software to your USB in Step 5 above. Simply navigate to contents of USB flash drive from File Explorer and run setup.exe to install the required drivers for your Mac.
Step: 12: After the drivers are installed and your computer is rebooted, you should now have fully functional Windows 10 running on your Mac.
win10desktop
Dual-boot Windows 10 with OS X:
Now to dual-boot between the two operating systems, that is Windows 10 and OS X Yosemite, during Mac’s startup boot chime, press and hold option/alt key until you are presented with a menu to choose between Windows and Mac partitions, select your desired OS to boot into it.


Wednesday, 29 July 2015

Download Windows 10 Pro ISO File Without Product Key From Microsoft

Microsoft Windows 10 is finally here, and according to Microsoft Chief Executive Officer Satya Nadella, it marks a “new era” for personal computing. It remains to be seen as to whether consumers and businesses around the world will agree with Nadella’s assessment of the operating system, but it’s safe to say that this is Microsoft’s most ambitious and potentially impressive launch till date.
We understand that the majority of users would have downloaded Windows 10 directly through ‘Windows Update’ as part of the free-of-charge upgrade process, but for those in need of an official Windows 10 ISO file, rest assured that Microsoft hasn’t forgotten about you.
Windows 10 ISO main
Microsoft has clearly attempted to make sure that all bases are covered for this release of Windows. Although the company started initiating pre-downloads of the operating system to registered PCs approximately 24-hours before the official launch, it does appear to recognize that some consumers would require an official ISO image of the Windows 10 platform whenever the need to manually install or reinstall the OS on a formatted machine arises. The ISO image will of course allow for the creation of a bootable USB flash drive or DVD, to serve as an installation source.
Best of all, you don’t need any product key to download the ISO media file from Microsoft. Just about anyone can download it as long as they have an Internet connection. Though it is important to note that genuine Windows product key will be required during clean installation process.
As part of the ISO offering, Microsoft has created a relatively small check list of what’s actually required before beginning the download:
  • An active and reliable Internet connection.
  • Enough storage space available on the computer being used to download the ISO.
  • A blank USB storage device or DVD with at least 4GB of space for the creation of media. There’ll also be the requirement for a DVD burner if that’s your chosen medium.
  • Make sure your PC meets all other Windows 10 requirements, you can check those here: How To Prepare Your PC For Windows 10 The Right Way [Guide].
  • As mentioned above, if you are doing a clean install, a genuine Windows product key will be required during installation process.
If all of those criteria are met then Microsoft has put up an official Windows 10 Disc Image (ISO) download page here.
Select your desired edition:
Screen Shot 2015-07-29 at 8.20.42 PM
Select the language:
Screen Shot 2015-07-29 at 8.21.04 PM
And you’re good to go!
Screen Shot 2015-07-29 at 8.21.20 PM
It really couldn’t get any simpler, and it’s great to see that Microsoft has attempted to cover all avenues with this Windows 10 release.
IMG_2796
You may also like to check out:


How To Download And Install Windows 10 Free Upgrade [Tutorial]

Windows 10 is now live, if you are eligible for a free upgrade, you will get a notification for the download soon.
The following tutorial helps you download and install the free Windows 10 upgrade on your PC.
Windows 10 final install guide main
Before you begin, make sure:
Step 1: Run Windows Update and see if your free reserved copy of Windows 10 is ready for install. It is important to note here that Microsoft is doing a phase rollout which means not everyone will get the update on day 1.
Windows 10 force download
If your Windows Update is showing you ‘We’ll let you know when the upgrade is ready to be installed on this PC.’ message, fret not, you can force it to download the update right now without any waiting time. Follow the instructions here on how to do that: Force Download Windows 10 Free Upgrade Right Now, Here’s How [Tutorial].
Windows 10 force download 3
Step 2: When Windows Update is finished downloading Windows 10 update, you will get the following prompts.
Either click on Restart now on Windows Update screen.
Windows 10 force download 9
or Start the upgrade now on this screen.
Windows 10 force download 12
Step 3: Your PC will now reboot, after which Windows 10 installation will automatically begin.
The installation is divided into three phases: Copying files, Installing features and drivers, Configuring settings.
IMG_2794
You don’t need to do anything. Just wait patiently for it to do its thing. During the installation process, your computer may restart a couple of times. The duration of this process can take anywhere from 10 to 15 minutes, depending on the size of your data and speed of your computer.
Step 4: Once the installation is complete, you will boot into this screen.
IMG_2795
Step 5: Now simply follow the on-screen instructions to get to the login screen.
IMG_2796
That’s it! You’re done! Happy Windows 10 day!


Monday, 27 July 2015

Find WiFi Network Password On Windows Or Mac OS X, Here’s How

We all connect to so many different WiFi networks that it’s easy to get them mixed up. You no doubt have at least one WiFi network at home, then there’s the one at work, and probably one or two at your favorite coffee places, plus any others we missed for the list. WiFi is the lifeblood of computing, and we often take it for granted.
If you’re anything like us, you connect to so many different networks that it’s easy to forget which password belongs to which, and that problem is only amplified if you use more than one machine, or have perhaps a tablet and smartphone to connect as well. All these connections mean it’s surprisingly easy to forget the password to your networks, and while that might not be a problem the majority of the time, if you want to connect a new device then you’re going to need that password. Thankfully, if you’ve got a machine handy that’s already connected, finding the password out is as easy as entering one command.
WiFi
Depending on whether you’re using a Mac or a Windows PC, you’ll need to enter one of two commands. Here’s what you’ll need to do.
Mac OS X:
  1. Open a new Terminal window via either the Applications folder or Spotlight Search.
  2. Copy and paste this command, replacing the ‘SSID’ text with the name of your network: security find-generic-password -ga SSID | grep password
  3. You may be prompted to enter an administrator account’s username and password, but after that you’ll be shown the password for whichever WiFi network you’re using.
Windows:
  1. Run Command Prompt.
  2. Copy and paste this command, replacing the ‘SSID’ text with the name of your network: netsh wlan show profile name=SSID key=clear
  3. You’ll now be shown your WiFi network’s password.
It’s worth noting that you’ll need to enter you network’s name exactly as it is presented – it’s case sensitive – else you’re not going to get very far. Make sure any zeroes aren’t the letter Os as well because that’s a very easy mistake to make!
Wifi.jpg
And that’s how you find the password of the WiFi network you’re currently logged into.


Sunday, 26 July 2015

How To Prepare Your PC For Windows 10 The Right Way

After what seems like forever, Windows 10 is almost upon us. Microsoft has been working on the replacement for Windows 8/8.1 for a good while now, and if you can overlook the omission of Windows 9 from Microsoft’s release schedule, Windows 10 is shaping up to be well worth installing. Going live on July 29th, the Windows 10 update is one that many should be readying themselves for, especially considering that the upgrade won’t cost most people a penny.
If you’re just starting to get all of your ducks in a row for Windows 10, then here’s a handy rundown of what you need to make sure everything is in order before hitting that Install button. Better safe than sorry!
Windows-10-prepare main
Check System Requirements:
There’s nothing worse then psyching yourself up for a big Windows upgrade only to find out that your old PC just doesn’t cut the mustard anymore. Luckily, the list of things needed in order to get Windows 10 installed is a short one, with just 1GB of RAM needed for the 32-bit version and 2GB required for the 64-bit flavor. Around 20GB of free space should see you through just fine, and a screen resolution of no lower than 800×600 is needed in order for Windows 10 to be installed. Apart from that, you should be good to go no matter what you’re using.
  • RAM: 1GB for 32-bit / 2GB for 64-bit
  • Storage: 16GB for 32-bit / 20GB for 64-bit
  • CPU: 1GHz or faster
  • Graphics: DirectX 9 capable video card
Backup:
Make sure you backup your data to either a cloud based service like Microsoft own OneDrive or locally using any external hard drive you may have.
Free up Space:
With around 16GB required for the 32-bit version of Windows 10 and 20GB for the 64-bit, you may need to start deleting unused files and removing applications that you don’t need anymore. Clearing caches and deleting temporary files using Disk Cleanup utility in Windows is usually good for taking some of your hard disk space back, but it’s applications that take the most space up here. Be ruthless – you’ll thank us for the relatively clean slate later.
Update everything:
It never hurts to make sure that you’re all updated to the latest version of whichever version of Windows you use before trying to make the jump to Windows 10. It really shouldn’t matter, but strange things happen when installing a new OS, especially one that is so new out of the gate. Make sure all of your drivers and security patches from Windows Update are up to date as well, whilst you’re at it.
Reserve your free Windows 10 copy now:
If you are running Windows 7 or Windows 8.1, you can reserve to get a free copy of Windows 10 as soon as Microsoft releases it officially next week. To reserve your copy of Windows 10, follow the instructions here:

Once all of those boxes are ticked, you should be all set for Windows 10 day. We’re quietly excited to see how the new version of Windows is received after lukewarm responses to Windows 8 and Windows 8.1, but we suspect that Windows 10 will right some of the wrongs of its predecessors.
Let’s hope so, at least.
Windows-10-1


Monday, 13 July 2015

Windows 10 Retail Packaging here're details

Win10Pro.jpgWin10Home.jpg
Supposed leaked images of Microsoft's plans for Windows 10 retail packaging have surfaced. The leak comes from German site WinFuture and are, as yet, unconfirmed. However, the images (there's even more on the WinFuture site) all show a similar, appealing design, highlighting the laser-created Windows 10 wallpaper that Insiders have grown accustomed to for the past few technical Builds.

If these hold to be true, these are the actual boxes consumers will find stacked on retail store shelves and the images used for online store recognition.

As you can see from the images, it seems Microsoft may be assigning specific colors to the different Windows 10 editions. Blue for Home and Purple for Pro. Personally, I think that's just the opposite of what it should be. I'm not sure why exactly, and can't exactly put my finger on it, but Purple seems to be a much more consumer friendly color.

What do you think?


Sunday, 12 July 2015

Windows PC Market Dropped by 10% Last Quarter

laptops pc

As the launch of Windows 10 nears, the current state of Microsoft’s operating system appears to be turning even bleaker.

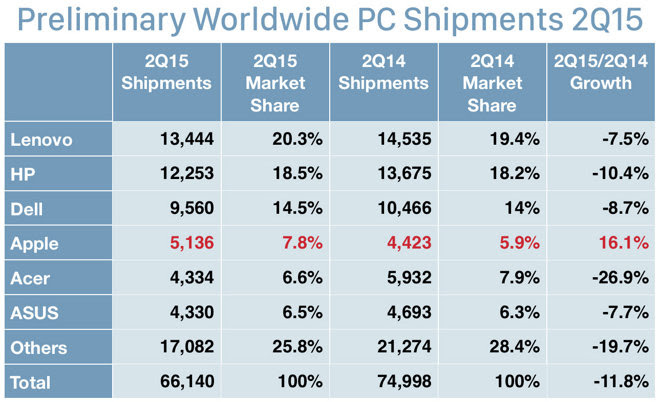
According to research firm Gartner, PC OEMs sold 68.4 million PCs in the second quarter of 2015, a drop of 9.5%. IDC, on the other hand, calculated an even nastier drop of 11.8 percent to just about 66.1 million units. These surveys don’t include Windows tablets, though.

It may not be Microsoft’s fault at all in this instance. As the Windows 10 picks up some momentum, some decline was expected, though the trend seems to have disturbed the company for some time now. With the completion of the next giant leap in the OS’s history, the company will hope to regain some of its lost glory.

Lenovo, as expected, took the honors of leading the pack, with sales of 13.44 million units, down 7.5% according to IDC. HP, Dell, ASUS and others took sizeable hits too, but in the worst state by a country mile was Acer, whose market share shrunk by a massive 26.9%. That’s far from an ideal situation to be in.

Meanwhile, as Microsoft observes a grimmer outlook Apple’s Mac seems to be doing quite well. The company’s systems saw a year-on-year growth of 16.1% to see sales climb to 5.1 million units, up from 4.4 million units a year ago.

It seems like Cupertino is capitalizing just where Redmond is losing it. It alone won’t ameliorate the industry’s situation but with a higher price point, it will make enough revenue to satisfy its producers, not-to-mention also rubbish the highly unpopular view that Apple should leave this market segment.
IDC chart courtesy of Apple Insider